Subscribe For Free Updates!

We'll not spam mate! We promise.

Showing posts with label Computer_Tricks. Show all posts

How to make multiboot USB for installing Windows XP N Windows 7

:: How to make multiboot USB for installing both Windows XP N Windows 7 ::

Novicorp WinToFlash_Tech_BY_Check

                 Some time our operating system get crash form viruses our any other harmful malicious code that infect our PC/LAPTOP and we must be to change our operating system that time we search our old OS disk to install Operating system in our PC to remove that viruses..

                 Now forgot that OS disk and use USB to install Operating System in hard drive. My this article helps u to install OS using USB pen drive or Flash device..

Basic Requirement :
  • Flash device 2GB(Windows XP) And 4GB (Windows 7 or vista).
  • Operating System disk that should me need for one time only.
  • Most Important "Novicorp WinToFlash v0.7 ".
                       Download from here " DOWNLOAD "
                                                Or
                       Use torrent to download " DOWNLOAD "
                       
                       Download  WinRAR for extracting files " DOWNLOAD "
  •  Basic knowledge about computer :).
Use following step :
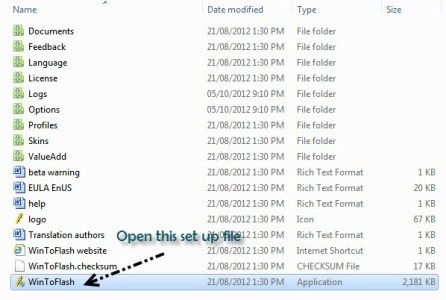
  • Open Novicorp wintoflash RAR file using " WINRAR " and open WinToFlash setup file.
How to make multiboot USB for installing both Windows XP N Windows 7_tech_BY_Check
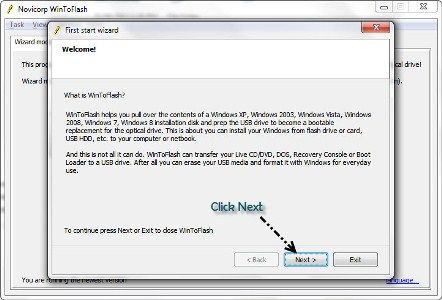
  •   Click Next.
How to make multiboot USB for installing both Windows XP N Windows 7_tech_BY_Check
  •  Accept license agreement and click Next.
How to make multiboot USB for installing both Windows XP N Windows 7_tech_BY_Check
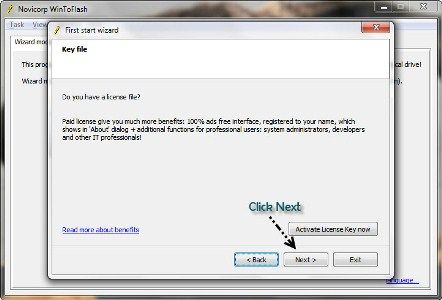
  •  Don't Click on " Active License Key Now " button direct Click on Next.
How to make multiboot USB for installing both Windows XP N Windows 7_tech_BY_Check
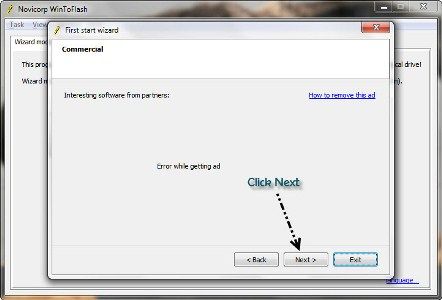
  •  Don't consider that error message just Click On Next button.
How to make multiboot USB for installing both Windows XP N Windows 7_tech_BY_Check
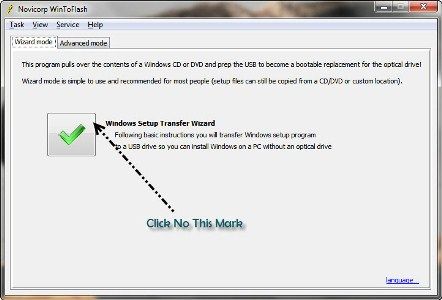
  •  Here click on this mark.
How to make multiboot USB for installing both Windows XP N Windows 7_tech_BY_Check
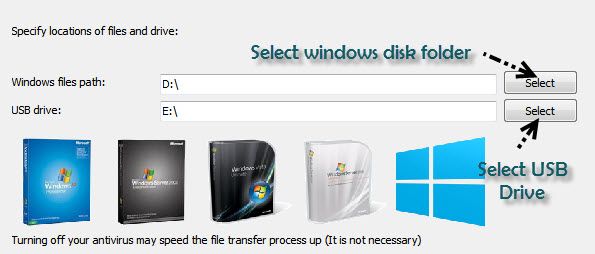
  •  Here select windows disk path in 1st column and select USB path in 2nd column.
How to make multiboot USB for installing both Windows XP N Windows 7_tech_BY_Check
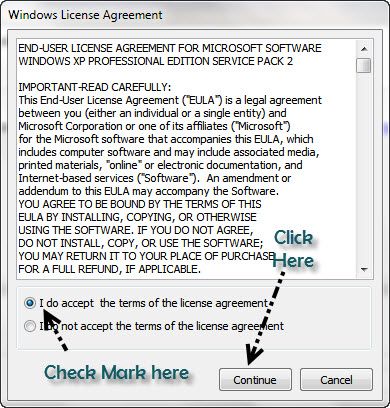
  • Here again accept agreement and click Continue.
How to make multiboot USB for installing both Windows XP N Windows 7_tech_BY_Check
  •  Just answer the simple CAPTCHA question and Click Next.
How to make multiboot USB for installing both Windows XP N Windows 7_tech_BY_Check
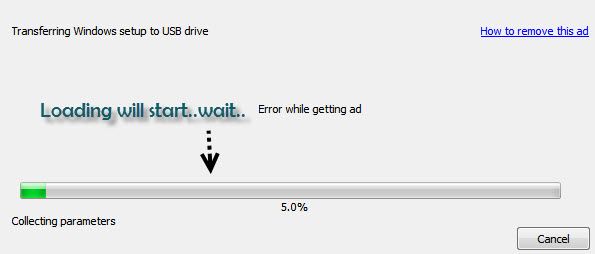
  •  After continue buttom loading will appear just wait for finishing.
How to make multiboot USB for installing both Windows XP N Windows 7_tech_BY_Check
  •  After finishing Click on Next.
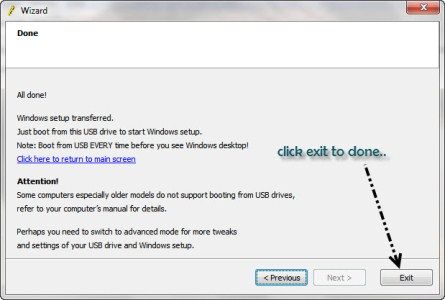
  •  Here we go..!!! your work is finish.just Click on Exit.

           Here your USB flash device ready to go for install operating system in your PC/LAPTOP. after this some little step u must to folllw.
  • Connect your flash device to PC/LAPTOP.
  •  Restart and boot using your PC/LAPTOP booting key (F8, F10 may be any on your brand depent).
  • After restarting PC/LAPTOP will ask for boot press that key and select 1st option has appear on boot screeen.
  • Follow all following step.
  •  Don't forgot to put a comment bellow.
                                                                            :: ENJOY ::

Windows 7 Keyboard Shortcuts

:: Windows 7 Keyboard Shortcuts :: 

 
Windows 7 Keyboard Shortcuts-techbycheck
                   
 Master List of Windows 7 Keyboard Shortcuts :


1.[Win+M] – Minimize all open windows
2.[Win+Shift+M] – Undo all window minimization
3.[Win+D] :- Toggle showing the desktop
4.[Windows+Up] – Maximize window
5.[Windows+Down] – Minimize windows / Restore
6.[Windows+Left] – Dock window to the left side
7.[Windows+Right] – Dock window to the right side
8.[Windows+Shift Up] – Maximize vertical size of window
9.[Windows+Shift Down] – Restore vertical size
10.[Windows+Shift Left] – Move window to left monitor
11.[Windows+Shift Right] – Move window to right monitor
12.[Win+Spacebar] – Aero desktop peek
13.[Win+Home] – minimize/maximize all inactive windows
14.[Alt+F4] - Close the active window
15.[Alt+Tab] - Switch to previous active window
16.[Alt+Esc] – Cycle through all open windows
17.[Win+Tab]- Flip 3D
18.[Ctrl+Win+Tab]- Persistent Flip 3D
Taskbar

1.[Win+Any number (1, 2, 3, .., 0)] – open the corresponding taskbar pinned program
2.[Ctrl+Click a pinned taskbar icon] – cycle through the program’s open windows
3.[Shift+Click a pinned taskbar icon] -run a new instance of the program
4.[Ctrl+Shift+Click a pinned taskbar icon] – run a new instance of the program as administrator
5.[Shift+Right-click on icon] – Show window menu (Restore, Minimize, Move etc)
6.[Shift+Right-click on grouped icon] - Show window menu (Restore All, Minimize All, Move All etc)
7.[Win+T] – Cycle through applications on taskbar (showing its live preview)
8.[Win+Shift+T] – As above, but in reverse order
9.[Win+R] - Opens Run dialog box
General

1.[Win+P] – show presentation mode projector options
2.[Win+G] – show desktop gadgets
3.[Win+L] – Lock computer
4.[Win+X] - Mobility Center
5.[Win++] - Zoom in
6.[Win+-] – Zoom out
7.[Win+=] – Magnifier
Windows Explorer

1.[Alt+P] - Show/hide Preview Pane
2.[Alt+Up] - Go up one level
3.[Alt+Left/Right] - Back/forward

How to use Windows XP mode in Windows 7

:: How to use Windows XP mode in Windows 7 ::

Introduction:

Windows 7 XP mode is a virtual machine running Windows XP that lets us to run the applications that run only in Windows XP and not in Window 7. We can have a look at the basic requirements and installation procedure of the XP mode in Windows 7.

Basic Requirements to run XP mode:

• XP mode is available only for Windows 7 Professional, Ultimate and Enterprise editions.

• Microsoft virtual PC, to run XP as a virtual machine.

• Minimum 2 GB of RAM (which is more than the 1 GB of RAM-Windows 7 hardware requirement.)

• A processor that supports hardware assisted virtualization (HAV). To check if the processor supports HAV, please follow the below steps

Download the Hardware-Assisted Virtualization Detection Tool from the Windows XP Mode and Windows Virtual PC support website. This tool can check if the processor supports HAV or not.

If the processor supports the HAV, you need to make sure that it is enabled. Steps to enable HAV in the bios vary depending on the OEM models (Dell, HP, and Panasonic.etc). Appendix A provides the steps to enable HAV in some of the OEM models.

If it does not support HAV, you can download an update from Microsoft Download center that can remove the HAV requirement for XP mode.
Windows XP mode in Windows 7-techbycheck
Note: You can use this update only if you are using the XP mode in the Microsoft virtual PC with Windows 7. This will not work if you are using any other combination of operating systems.

Installing Windows XP mode:

To use windows XP mode, you need to download and install Windows XP Mode, which is a fully licensed version of Windows XP with Service Pack 3. You also need to download and install Windows Virtual PC, which is the program that runs virtual operating systems on your computer.

You can download them from the Microsoft Windows XP mode and Windows virtual PC website. You need to select the language and edition of Windows 7 while downloading them.

Once installation is completed you need to restart the PC.

• Now click on start and go to All programs. Click Windows virtual PC and then Windows XP mode.

• You need to accept the license terms and enter credentials that should be used to launch the XP mode. Proceed and start the set up wizard.

• Once set up is complete Windows XP mode opens in a separate window.

Installing a program in Windows XP mode:

• Click on start in the Windows 7 computer. Go to All programs and click Windows virtual PC and then Windows XP mode.

• Insert the disk with the installation files for the program and browse it in XP mode and install it. Once installation is complete close the XP mode window.

• Now go to All programs in the start menu of Windows 7 computer. Then go to Windows virtual PC and click Windows XP mode applications. Now select the program you want to launch.

Difference between XP mode and virtual XP machine:

All applications you install in the Windows XP Mode client will be available automatically on the Windows 7 host computer. When you run an application, it starts in its own separate window as any other application does. From the perspective of the user, this means that applications appear as though they are executing directly within Windows 7.

Limitations:

• XP mode has x86version of XP professional with SP3. Windows virtual PC does not support x64 virtual clients, which means that you cannot use XP mode as a compatibility option for x64 applications.

• It requires more system resources than the built-in or custom compatibility modes.

• Administrators need to maintain and manage Windows XP virtual client up to date with updates even though the people using the computer will not be accessing the Windows XP operating system directly.

• The antivirus program with Windows 7 machine will not work with the XP mode. We need to have a separate antivirus program for the XP mode and need it updated.

Steps to enable HAV in some of the OEM models:

Dell Systems:

• Depress the F12 key when boot menu text appears at startup
• Select BIOS setup and depress the Enter key
• Using the mouse, expand the Virtualization Support menu item by clicking on the plus to the left of Virtualization Support and select Virtualization
• Check the Enable Intel Virtualization Technology checkbox
• Click Apply
• Click Exit
• Fully shut down (power off), wait a few seconds, and restart your computer

HP systems:

• Depress Esc key when prompted at startup
• Depress the F10 key to Configure BIOS
• Scroll to System Configuration using the arrow keys
• Select Virtualization Technology and depress the Enter key
• Select Enabled and depress the Enter key
• Depress the F10 key to save and exit
• Select Yes and depress the Enter key
• Fully shut down (power off), wait a few seconds, and restart your computer

Lenova ThinkPad Systems:

• Depress the blue ThinkVantage key when prompted at startup
• Depress the F1 key to enter the BIOS setup utility
• Using the arrow keys, scroll to Config and depress the Enter key
• Scroll to CPU and depress the Enter key
• Scroll to Intel® Virtualization Technology and depress the Enter key
• Select Enabled and depress the Enter key
• Depress Enter key to continue
• Depress F10 key to save and exit
• Select Yes and depress the Enter key
• Fully shut down (power off), wait a few seconds, and restart your computer

Panasonic:

• Depress the F2 key when boot menu text appears at startup
• Select "Advanced" menu in Setup Utility
• Change "Intel® Virtualization Technology" setting from "Disable" to "Enable"
• Depress F10 to exit Setup Utility
• Select "Yes" in confirmation menu
• Depress Enter to exit confirmation menu.

Acer, Samsung, Asus:
PCs capable of supporting Windows XP Mode have already been enabled and do not require additional configuration.

To 'Windows 8', or not to 'Windows 8?'

:: To 'Windows 8', or not to 'Windows 8?' ::

         Through a student license, I received a copy of Windows 8 Pro x64 (see attachment).

Where to even start...

         When installing Windows 8 (the first time), I upgraded from 7 to 8, which apparently is a bad idea. I can't imagine why it's a such an issue as it acted like I was reinstalling Win 7 (moving old install to Windows.old).
It also caused many issues with permissions with the new system that I had to command prompt my way back to owning directories and even the root drive.

If you make the jump to Windows 8, do not upgrade. Do a clean install!

            I've been using Windows 8 for about 2 weeks now and have seen some issues that don't really matter much to me, and others that are quite annoying.
  1. User Account Control (UAC) must be enabled to run any Metro app
  2. Even though the new sexified Task Manager shows little usage, the system is noticably slower
  3. Windows now strongly suggests that you do not use a local account, instead they want you to use a live ID. It's a catch 22. If you do, then your profile follows you to any Windows 8 machine, but then your local activity is uploaded constantly. If you don't, then you have to provide credentials for every Metro app.

         I think everyone here has seen the Windows 8 previews and screenshots, there are some cools features.
  1. Native support for mounting ISO's
  2. Windows Explorer 'Ribbon'
  3. Task Bar management - Both screens now have a taskbar and you can make Windows only show the open program icon on the taskbar for the monitor it is open on.

            The other change from preview to final was the inability to restore the Start Button without completely disabling the Windows 8 features all-together. Doesn't make much difference to me as I rarely use the Start Button and like it being gone. I setup RocketDock to have links to all the frequently used programs anyway.

           Overall, Windows 8 final needs another update before they release it. The issues encountered when upgrading from 7 are going to piss a lot of people off (in my case, Metro apps stopped working completely). It's going to take some getting used to for Desktop users (or just don't use it at all... there's really nothing "Great" about it), but it's really for tablet users. I like the new Windows, but I'm not typical user and this OS will turn a lot of users off. Luckily, you can buy a new system and downgrade to 7.

         Apologies for the randomly ordered thoughts, if you have questions about the OS, I'd be happy to answer. 
 
Attached Thumbnails
Windows 8 Preview-techbycheck
 

Trouble signing onto my laptop : forgot password

:: Trouble signing onto my laptop : forgot password ::

forgot password-techbycheck

If you get it, here is any easy way to remember it

1)GO TO CMD

2) TYPE IN " NET USER"

3 )you will see your password

IBM Says Practical Quantum Computers are Close

:: IBM researchers claim they are now close to have access to basic technologies that would allow them to build a "minimum" quantum computer. ::


                                             According to the company, scientists have found ways to retain the integrity of quantum bits (qubits) and reduce computation errors as a result. The solution appear to be superconducting qubits that are constructed via traditional silicon fabrication techniques and hold the potential to scale up to potentially thousands or millions of qubits one day.
"The quantum computing work we are doing shows it is no longer just a brute force physics experiment. It's time to start creating systems based on this science that will take computing to a new frontier," said IBM scientist Matthias Steffen, who manages the IBM Research team that works on quantum computing systems. The vision of quantum computing is to enable computers to do "millions of computations at once" with a single qubit. According to IBM, a 250-qubit system "contains more bits of information than there are atoms in the universe." In contrast to a traditional bit, which can either have the value "0" or "1", a qubit can have "0", "1" and both values at the same time.
                      While there is a clear vision to build a quantum computer, scientists are dealing with a number of substantial roadblocks to realize such a device. One key problem remain interference factors that influence the controllability and reliability of qubits, such as temperature, electromagnetism and material defects. IBM said that the transition to a “three dimensional” superconducting qubit (3D qubit) allowed them to extend the time a qubit retains its state to 100 microseconds, which is a 2 to 4x improvement over previous results. It is not eternity, but IBM says the value " reaches just past the minimum threshold to enable effective error correction schemes and suggests that scientists can begin to focus on broader engineering aspects for scalability." The company has built a 3D qubit device with a 1mm qubit as part of a Sapphire chip to demonstrate its research progress.
                       IBM said that it believes that, in the future, a "classical" computer system will integrate quantum computing hardware to form a functional quantum computing system. The next challenges to achieve this goal will be necessary advances in communications and packaging technology.